Saturday, August 15, 2015

Exchange Troubleshooting Assistant (ExTRA) : Outlook Meeting Vanishing


Exchange Troubleshooting Assistant (ExTRA) :  How To Take Traces Using ExTRA and Analyse


In this post I will be explaining how to take Exchange traces using ExTRA tool and will show how the traces will look like.

This tool is basically used for various Exchange troubleshooting, but in this post we will be seeing hot to Enable Exchange tracing for calendar issues.

Note: It is always recommended to take the help of  Microsoft Support Engineer on Call before proceeding these steps.

The issue what we are going to check is for an user whose calendar items are getting missed frequently. So, to check how the calendar invites are missing/deleted we are going to follow these steps.

      How to enable trace in Exchange Servers.

1.     Exchange 2007/2010 comes in built with ExTRA which helps you trace activities that occur in the store or database
2.     Open cmd prompt as admin and type ExTra to open it “or”
3.     Start –> Run –> ExTra
4.     This will open the Exchange Troubleshooting Assistant
5.     Now Select a new task and click next and select “Trace control”. This will throw an error “This server does not have the module needed for interpreting traces. Continue only if this is being done under the direct supervision of a qualified Exchange support engineer.”
6.     On the “Configure Trace File” page, configure the location of the trace
7.     DO NOT enable “circular logging” and select “Create a new file when max trace file size is reached”
8.     Under “select the type of tracing needed” select the option “Set Trace Tags Manually”
9.     Select Trace Types – PFD, Fatal, Error, Warning, Info, Debug, Performance, Function
10.  Under ‘Components to Trace’ – Select “Store”
11.  Select ‘Trace Tags’ –
tagCalendarChange
tagCalendarDelete – This tag is going to capture all calendar deletions
tagMtgMessageChange
tagMtgMessageDelete
12.  If you want to enable tracing for just one sure, do so using “Show mailbox trace filtering options” and select the user
13.  Now click “Start Tracing”
14.  The next time the user reports the issue, you will have the “*.etl” file with details on who/what deleted it

15.  Stop and Exit the trace when you feel comfortable the collected logs are enough to troubleshoot.
16.  Let Microsoft PSS can analyze the output file and see what deleted the calendar item


This is what I saw on analysing the output file:


This means that the one of the re-occurring calendar item with the subject “July-Dec 2015-APJ Local Deal Governance” was deleted at “12/Aug/2015 12:28:45 AM” by the user "System Administrator “on outlook client”


How to convert the ETL logs to CSV report.

Traces will be viewable by an Exchange Support Engineer, he will use a tool to view the ETL logs.

extrace.exe –c –v ExchangeDebugTrace.ETL > output.csv

Notes:

  • Trace logs might get filled up quickly, so when you enable the tracking make sure there is          enough free disk space on the server.
  •  Stop the trace when you don’t want it any more. Make sure you exit the console.
  •  Use ExTRA tool for the respective mailbox versions. E.g... Exchange 2007 / 2010.
  •  To enable the trace you need to always login to the mailbox server on which the user                  mailbox is present.

 If you need any help to analyse the ETL logs, please forward we could try to help you.


Thank you for visiting my blog

Please update your comments or feedback.

Contact me @: exctech2013@gmail.com

Friday, July 24, 2015

Generating Exchange Environment Report


Generating Exchange Environment Report


This script automatically generate a report that give an overview of our existing environment with following contents.

Total Servers per Exchange version & service pack
Total Mailboxes per Exchange version & service pack, plus Office 365 remote mailboxes
Totals for Exchange roles across the environment

  • A site-by-site breakdown for the following:
  1. Mailboxes per site
  2. HTTPS FQDNs used for Internal, External and SCP URLs
  3. CAS array names
  4. Exchange servers, version, update rollup and version, service level, highlighted installed roles, OS version and service pack
  • A breakdown of each Database Availability Group including:
  1. DAG name, member count and member list
  2. Database information such as
  3. Name
  4. Mailboxes per database and Average Size
  5. Archive mailboxes (If Available) per database and Average Size – only shown if a DB includes Archive mailboxes
  6. Database and whitespace size
  7. Database and log disk free space percentage
  8. Last full backup date/time (new) – only shown if at least one DAG DB has had a full backup
  9. Circular Logging state (new) – only shown if at least one DAG DB has circular logging enabled (If Available)
  10. Server hosting the active copy
  11. List of servers hosting copies and copy count.

A breakdown of Non-DAG databases including Exchange 2007 DBs, including the database information above, along with Storage Group name.

This dashboard is limited to Exchange 2003/2007 and Public folders. Where it does not give detailed information’s for Exchange 2007 clusters. But, shows the output as ClusMBX in the output.


Script to Generate the Exchange Environment Report

Download the Script from the following link.

Save this script in Text format and convert into ps1. or Directly save in PS1 format.

https://drive.google.com/open?id=0B9raLabzxFwxRlhKVjFkY2JsRzA

Executing the script is straightforward – the only setting you need is to specify where to write the HTML file:

.\Get-ExchangeEnvironmentReport -HTMLReport c:\report.html

If you want it to email the results, the follow parameters are available to allow the report to be sent directly from the script:

.\Get-ExchangeEnvironmentReport -HTMLReport c:\report.html -SendMail:$true -MailFrom:you@example.com -MailTo:you@example.com -MailServer:smtp.example.com

Finally, to schedule the report to be generated nightly, execute with your preferred options and add the -ScheduleAs parameter, for example:

.\Get-ExchangeEnvironmentReport -HTMLReport c:\report.html -SendMail:$true -MailFrom:you@example.com -MailTo:you@example.com -MailServer:smtp.example.com -ScheduleAs:DOMAIN\user

Output View of this Report.


Thank you for visiting my blog

Please update your comments or feedback.

Contact me @: exctech2013@gmail.com


Sunday, December 7, 2014

Clear C Drive Disk Space


Clear C Drive Disk Space


This a script which help to free-up the C:\ drive disk space, also this gives an output with details on the contents it deleted during executing this script.


SCRIPT 

Save this script in PS1 format.


Function Cleanup {
<#
.CREATED FOR:
    Disk Cleanup
.CREATED ON:
    10\17\2013
.Synopsis
   Aautomate cleaning up a C: drive with low disk space
.DESCRIPTION
   Cleans the C: drive's Window Temperary files, Windows SoftwareDistribution folder, `
   the local users Temperary folder, IIS logs(if applicable) and empties the recycling bin. `
   All deleted files will go into a log transcript in C:\Windows\Temp\. By default this `
   script leaves files that are newer than 7 days old however this variable can be edited.
.EXAMPLE
   PS C:\Users\mkerfoot\Desktop\Powershell> .\cleanup_log.ps1
   Save the file to your desktop with a .PS1 extention and run the file from an elavated PowerShell prompt.
.NOTES
   This script will typically clean up anywhere from 1GB up to 15GB of space from a C: drive.
.FUNCTIONALITY
   PowerShell v3
#>
function global:Write-Verbose ( [string]$Message )

# check $VerbosePreference variable, and turns -Verbose on
{ if ( $VerbosePreference -ne 'SilentlyContinue' )
{ Write-Host " $Message" -ForegroundColor 'Yellow' } }

$VerbosePreference = "Continue"
$DaysToDelete = 7
$LogDate = get-date -format "MM-d-yy-HH"
$objShell = New-Object -ComObject Shell.Application 
$objFolder = $objShell.Namespace(0xA)
$ErrorActionPreference = "silentlycontinue"
                    
Start-Transcript -Path C:\Windows\Temp\$LogDate.log

## Cleans all code off of the screen.
Clear-Host

$size = Get-ChildItem C:\Users\* -Include *.iso, *.vhd -Recurse -ErrorAction SilentlyContinue | 
Sort Length -Descending | 
Select-Object Name, Directory,
@{Name="Size (GB)";Expression={ "{0:N2}" -f ($_.Length / 1GB) }} |
Format-Table -AutoSize | Out-String

$Before = Get-WmiObject Win32_LogicalDisk | Where-Object { $_.DriveType -eq "3" } | Select-Object SystemName,
@{ Name = "Drive" ; Expression = { ( $_.DeviceID ) } },
@{ Name = "Size (GB)" ; Expression = {"{0:N1}" -f( $_.Size / 1gb)}},
@{ Name = "FreeSpace (GB)" ; Expression = {"{0:N1}" -f( $_.Freespace / 1gb ) } },
@{ Name = "PercentFree" ; Expression = {"{0:P1}" -f( $_.FreeSpace / $_.Size ) } } |
Format-Table -AutoSize | Out-String                      
                    
## Stops the windows update service. 
Get-Service -Name wuauserv | Stop-Service -Force -Verbose -ErrorAction SilentlyContinue
## Windows Update Service has been stopped successfully!

## Deletes the contents of windows software distribution.
Get-ChildItem "C:\Windows\SoftwareDistribution\*" -Recurse -Force -Verbose -ErrorAction SilentlyContinue |
Where-Object { ($_.CreationTime -lt $(Get-Date).AddDays(-$DaysToDelete)) } |
remove-item -force -Verbose -recurse -ErrorAction SilentlyContinue
## The Contents of Windows SoftwareDistribution have been removed successfully!

## Deletes the contents of the Windows Temp folder.
Get-ChildItem "C:\Windows\Temp\*" -Recurse -Force -Verbose -ErrorAction SilentlyContinue |
Where-Object { ($_.CreationTime -lt $(Get-Date).AddDays(-$DaysToDelete)) } |
remove-item -force -Verbose -recurse -ErrorAction SilentlyContinue
## The Contents of Windows Temp have been removed successfully!
             
## Delets all files and folders in user's Temp folder. 
Get-ChildItem "C:\users\*\AppData\Local\Temp\*" -Recurse -Force -ErrorAction SilentlyContinue |
Where-Object { ($_.CreationTime -lt $(Get-Date).AddDays(-$DaysToDelete))} |
remove-item -force -Verbose -recurse -ErrorAction SilentlyContinue
## The contents of C:\users\$env:USERNAME\AppData\Local\Temp\ have been removed successfully!
                    
## Remove all files and folders in user's Temporary Internet Files. 
Get-ChildItem "C:\users\*\AppData\Local\Microsoft\Windows\Temporary Internet Files\*" `
-Recurse -Force -Verbose -ErrorAction SilentlyContinue |
Where-Object {($_.CreationTime -le $(Get-Date).AddDays(-$DaysToDelete))} |
remove-item -force -recurse -ErrorAction SilentlyContinue
## All Temporary Internet Files have been removed successfully!
                    
## Cleans IIS Logs if applicable.
Get-ChildItem "C:\inetpub\logs\LogFiles\*" -Recurse -Force -ErrorAction SilentlyContinue |
Where-Object { ($_.CreationTime -le $(Get-Date).AddDays(-60)) } |
Remove-Item -Force -Verbose -Recurse -ErrorAction SilentlyContinue
## All IIS Logfiles over x days old have been removed Successfully!
                  
## deletes the contents of the recycling Bin.
## The Recycling Bin is now being emptied!
$objFolder.items() | ForEach-Object { Remove-Item $_.path -ErrorAction Ignore -Force -Verbose -Recurse }
## The Recycling Bin has been emptied!

## Starts the Windows Update Service
##Get-Service -Name wuauserv | Start-Service -Verbose

$After =  Get-WmiObject Win32_LogicalDisk | Where-Object { $_.DriveType -eq "3" } | Select-Object SystemName,
@{ Name = "Drive" ; Expression = { ( $_.DeviceID ) } },
@{ Name = "Size (GB)" ; Expression = {"{0:N1}" -f( $_.Size / 1gb)}},
@{ Name = "FreeSpace (GB)" ; Expression = {"{0:N1}" -f( $_.Freespace / 1gb ) } },
@{ Name = "PercentFree" ; Expression = {"{0:P1}" -f( $_.FreeSpace / $_.Size ) } } |
Format-Table -AutoSize | Out-String

## Sends some before and after info for ticketing purposes

Hostname ; Get-Date | Select-Object DateTime
Write-Verbose "Before: $Before"
Write-Verbose "After: $After"
Write-Verbose $size
## Completed Successfully!
Stop-Transcript } Cleanup


Thank you for visiting my blog

Please update your comments or feedback.

Contact me @: exctech2013@gmail.com

Thursday, July 24, 2014

Part 5 : Migrate from Gmail to Office 365

Part 5 : Migrate from Gmail to Office 365

Self migration from Gmail to Office 365


Refer Part 4: Export and Import of Calendar and Contacts from Gmail to O365

http://exctech2013.blogspot.in/2014/07/part-4-migrate-from-gmail-to-office-365.html


This post helps to perform self migration from Gmail to O365 without administrator help.


Thank you for visiting my blog

Please update your comments or feedback.

Contact me @: exctech2013@gmail.com


Thursday, July 10, 2014

Part 4 : Migrate from Gmail to Office 365


Part 4 : Migrate from Gmail to Office 365
 
Export and Import of Calendar and Contacts from Gmail to O365


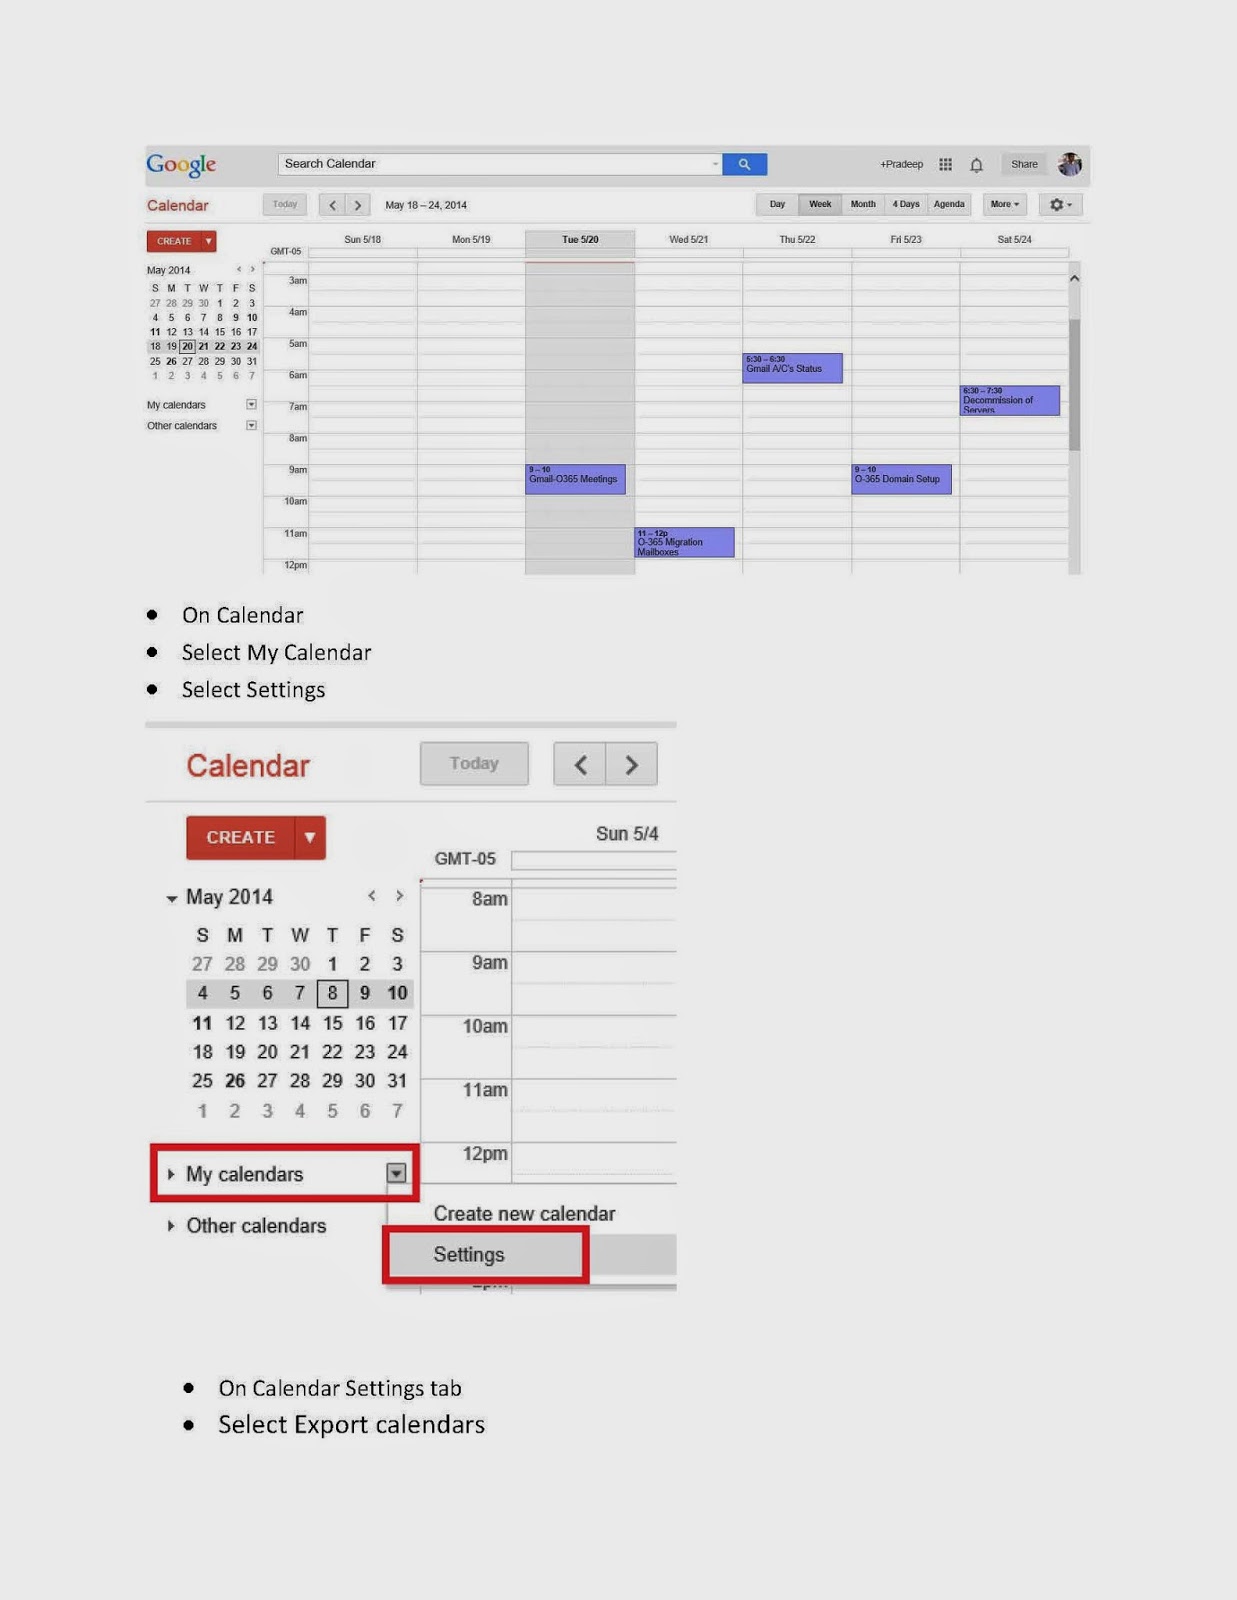
In this post, we are going to see how to Export and Import Gmail Contact and Calendar items to O365.


Refer Part 5: Migrate from Gmail to Office 365


Thank you for visiting my blog

Please update your comments or feedback.

Contact me @:
exctech2013@gmail.com


Monday, June 23, 2014

Part 3 : Migrate from Gmail to Office 365


Part 3 : Migrating from Gmail to O365
 
 Refer : Part 2 : Gmail IMAP Setting and Adding Gmail to Outlook Client
 
 
In this post we are going to see the following steps to migrate Gmail mailbox to O365.
 
  • Register a Domain
  • Create Users and Assign License
  • Create Gmail Migration File and Migration Endpoint
  • Creating DNS Records and Route Emails to O365
  • Verify Gmail migration completed successfully


 Part 4 : Migrate from Gmail to Office 365
 
Export and Import of Calendar and Contacts from Gmail to O365

http://exctech2013.blogspot.in/2014/07/part-4-migrate-from-gmail-to-office-365.html

 
Thank you for visiting my blog
 
Please update your comments or feedback.
 
Contact me @: exctech2013@gmail.com